Tuesday, October 19, 2010

Tapas Platter

I love living in cities or neighborhoods that are "walkable." In San Francisco, my favourite flat was the one on Polk and Bay. From there I could walk to the Marina, Crissy Field, Fort Mason, The Embarcadero, North Beach and even to Union Square on days when I'd be oozing with energy to climb the infamous hills of the city by the bay. I loved being a stone's throw away from the shops and restaurants of Polk, Union and Chestnut streets. It meant I could easily entertain myself when I could no longer bear one more minute stuck at home.

Now that I am in Sydney, I don't live within the city limits. In fact, we live quite a way from the city. The saving grace for a city girl like me is that I still have many places to walk to on days when I just need to get out. Now I enjoy walking to the beach where I still have my strip of cafes and small shops, along the coast to any of the other nearby towns and my most frequent walk - down the road to a plethora of choices when it comes to shopping for food.

I absolutely love it! I can actually spend a whole afternoon surveying all the different food stores to see what's fresh and what's on special. I then go home and proceed to plan my weekly menu and shop. For groceries, I have a choice of Coles, Woolworths and about 4 Asian ones. For fresh produce and higher end items I have Harris Farms and Dee Why Fresh Market, I have Aussie, Chinese, Korean and Vietnamese butchers to choose from, a Vietnamese bread bakery and a fish monger with the most beautiful seafood. What more can I ask for right? Sometimes I end up with too many meal ideas for the number of meals one can consume in a week. It's not a bad problem I know but there are weeks when I have to forbid myself from stepping foot in any of the said establishments in order to stick with the food budget!

Ah! The fish monger - he is one of my favourites because he really knows his products so well. It makes me feel more confident that I am buying good stuff when the person selling it to me has great tips to share and is really passionate about his/her product. This is actually the reason why I've stopped going to one of the Asian butchers I mentioned. Each time I'd ask about a certain cut of meat, he'd just shrug and show no interest in helping me figure out what the best cut is for the dish I want to make. One day it got to me and I couldn't help but tell him that he ought to learn more about his products so that he could answer customer questions and sell more effectively. I just felt like he was not giving his products the respect they deserved. That probably sounded weird but to me, this is the reason why I really like going to the fish monger's. So... back to him. I had been buying whole fish for steaming and roasting from him, then some prawns and mussels week in and week out. Recently though he had baby octopus on special and convinced me to try it. I'd never cooked octopus and I was a bit scared about taking this new challenge on. I just had to make sure that I was not going to serve up a rubbery mess. So I asked him some questions, did my own research and even asked my chef/seafood specialist cousin about how best to prepare these babies. I was finally ready to attack and this is what I did:

Pulpo a la Plancha
800 grams of baby octopus
1 cup lemon juice
1 cup olive oil
1/2 cup fresh parsley, chopped
4 cloves garlic, minced
2 t chili flakes
salt and pepper

Whisk the lemon juice, olive oil, parsley, garlic, chili flakes, salt and pepper. Marinate the octopus in the this mixture for 24 hours to tenderize and flavor the otherwise tasteless creatures. 

(I later found out from Maggie Beer's show that you can also use mashed kiwi fruit to tenderize octopus. I'll have to try that the next time I make this dish. She also mentioned that you should check with the fish monger that the octopus has been tumbled before being sold at the market as this ensures a tender product.)

When you are ready to cook and serve the octopus, slightly oil a grill pan. A charcoal grill is preferable but I don't have one. Drain the octopus from the marinade and sear each one for about 2 minutes on each side. You'll have to be careful not to overcook them or they'll become rubbery. Serve immediately while hot with a squeeze of lemon and a drizzle of extra virgin olive oil. 

It turns out that making octopus is really not that difficult. I was really happy that we ended up with a light, fresh and exciting tapas platter.

The other items on the platter are:
-Sobrasada on Melba Toast

-Spinach Salad with Blue Cheese and Lemon Vinaigrette

-Piquillo Peppers - dry grill whole red peppers directly on the flame of a grill or stove top. Once charred on all sides, put peppers in a paper bag. The steam will lift the skins off so you can slide them off simply by hand. Slice peppers into thin strips.

-
Champignones a la Jillo: - simply saute mushrooms with olive oil, garlic, butter, parsley, thyme, salt and pepper.


-Patatas - boil potatoes in water flavoured with lemon, a whole small onion, 1T whole black peppercorns, 2 bay leaves, and salt. Slice into rounds and finish with extra virgin olive oil, a squeeze of lemon and chopped parsley.


Thursday, October 14, 2010

Leftovers Part 2

I can't believe it's already October. I had been planning to put in the second installation of my leftovers story before September ended but geez, time really does fly. So I was into using up my leftovers with these lovely roti wraps I found at the Dee Why Market. I just love how delicate they are and how they toast up so beautifully. After having Chicken Curry for dinner two nights in a row - I serve it again, now hidden in a wrap!


I heat the roti in a griddle pan over medium heat to soften. I had made some chutney with apricots and an onion a few weeks back so I used it up here too. Feel free to make your own chutney or use pre-made ones if you have it in the fridge. Spread it along the bottom third of the roti then lay down 2 romaine leaves and some cilantro sprigs if you have some. Spoon the leftover curry over the romaine leaves and wrap tightly. Turn the wrap one or two times to brown it all around as much as possible. 
If you like mayo, some Japanese mayonnaise would work here. You can also add cottage or cream cheese. In place of chutney, I think slices of mango would be great too.

In case you want to make chutney, here's how I did mine. It may not be too authentic but it was still delicious: 


Apricot Chutney
1/2 T oil
1 clove of garlic, minced
1/2 small onion, minced
1/2 cup dried apricots, chopped
1T raisins
1 cup water
1/2 cup white wine vinegar
2 sprigs thyme
pinch of salt and pepper


Saute the onion and garlic in a small sauce pan, season with salt and pepper. Add the apricots, raisins and water to the pan. Simmer for 10-15 minutes until the dried fruits soften. At this time, add the vinegar and leaves from the thyme sprigs. Let the acid cook off for another 5-10 minutes. Taste and season as needed with salt and pepper. Allow the mixture to cool slightly and then puree in a food processor or blender.

Here is a rough recipe for the curry component. It is a really simple one from back home which goes as follows:


Chicken Curry
500 grams of chicken thigh or breast fillets - sliced and seasoned with salt and pepper
1T oil (I use rice bran oil)
3 cloves of garlic, minced
1 medium onion, chopped
1-2 medium carrots, cubed
2-3 red potatoes, cubed
1/2 t grated ginger
2 T curry powder
1 T ground coriander
1/2 T cumin
1 C coconut milk
1 T fish sauce
salt and pepper to taste
water to thin out sauce if necessary

Heat the oil in a casserole and sweat the onions and garlic over medium-high heat. Add the grated ginger and saute for about 2 more minutes the throw in the carrots and the potatoes. Next in are the chicken pieces. Sear them so they brown on all sides. Sprinkle the curry powder, coriander and cumin over the chicken pieces. Allow the spices to get toasty and then pour in the coconut milk. Bring the pot to a boil and lower heat to simmer for about 20-30 minutes until the chicken is thoroughly cooked. Season with fish sauce, pepper and salt if necessary. If the sauce is too thick, use some water to get the consistency to your liking. Serve hot over brown rice, with chopped hard-boiled egg, crispy bacon and chutney on the side. And for lunch the next day, use leftovers to make these wonderful wraps!

Saturday, September 25, 2010

Loving Leftovers

Adobo Flakes Wrap
Don't you just love the feeling of accomplishment when you manage to turn leftovers into something "new" for lunch the next day? I do! Yes, some dishes work better than others in the leftover department but I think those of us from the land of adobo can agree that this one is tops when it comes to aging gracefully. 


I made a huge vat of adobo recently. It was so huge that we had it for three meals and still, there was more. So, to change it up a little I decided to make adobo flakes. When I was living in San Francisco and my mom would come to visit, she would never head home without leaving a mound of adobo flakes in my fridge. It was her labour of love and it was simply the best! It could be consumed in so many ways: either on it's own, with eggs, as a sandwich, on a salad - I can go on and on. One version created by my pasta-loving brother-in-law, Mr. Noodleman was mixed into his spaghetti with marinara sauce. What a discovery! It may sound weird I know but it added heft and great flavour to a simple tomato sauce. We had so much of it one night, we almost passed out on the couch.


So now it was my turn to make adobo flakes. There definitely is room for improvement in my version. I just flaked the meat and cooked it down with the leftover sauce until all the liquid was absorbed. Then, I fried this in a little bit of oil until it turned to a brown crisp. I need to find a way to make it as fine and crisp as mom's but I have to say that it was still super yummy and crunchy. What's even better is I found yet another way of having these magical leftover flakes one hungry afternoon. All I had in the fridge was the adobo flakes, feta cheese, wraps and spinach. So my adobo flakes wrap was born out of:


1 naan wrap
1 small bunch of baby spinach
1/2 cup or more of adobo flakes
about 6 cubes of feta cheese (I used low fat and it was very good.)
1 T Hoisin sauce
1 T Japanese mayo (optional)

Lay the naan wrap in a pan over medium heat smear the Hoisin down the middle and the mayo next to it if you are using. Line the spinach leaves, feta cubes or crumbles and adobo flakes along the bottom half of the wrap. Roll over starting from the bottom so that the empty half can be wrapped snugly around the filling. Leave on the pan to heat through for about 2 minutes on each side. Transfer to a plate, cut in half and enjoy!


If I had access to kesong puti here, I would definitely use it. But anyhow, the feta worked really well and the combination of the adobo with the Hoisin just made it oh so delicious. A quick lunch that got two thumbs up from Mr. P. 

Monday, September 6, 2010

Discovering the Elements of Coq au Vin


I learned about mirepoix while visiting my Tita Paz in Cincinnati one summer. At the tender age of 8, I got such a kick out of saying this "fancy" French word which she explained meant the combination of onions, celery and carrots. I guess she saw that I had an interest for the kitchen as early as then. So from being her spectator and just watching her prepare meals for us, I quickly becoming her sous-chef for the summer. And boy did I prepare lots of mirepoix for her that year! Now that I think about it, she is surely one of my earliest cooking mentors.


Fast forward to Mother's Day back in 2001. I was still living in San Francisco and decided to treat my dear mother out to lunch at a French bistro in Yountville, Bistro Jeanty. It was then that she first introduced to one of the most basic French dishes: Coq au Vin. Immediately I fell in love with it. I loved how the chicken was so tender, infused with the red wine and all the yummy flavours coming from the herbs and guess what? The mirepoix! This is when I put two and two together, the little element I learned about at 8 years old turns out to be the basis of most French cooking. Similar to how the combination of garlic, onion and tomato is the basis of Filipino cooking.  Note taken: guisado to Filipino food = mirepoix to French food. 

This I can say is when I began to explore cooking French inspired dishes more and more. For some reason however, Coq au Vin was one of those that intimidated me for a while. I guess it was because from that time at Bistro Jeanty I started to order it a lot when eating out, and back then there were just some restaurant dishes that I was afraid to cook myself. I'm glad that is not the case anymore because really, Coq au Vin is a stew so it really is simple to do. 

This recipe may not be authentic or completely true to the classical French ways but it was satisfying, delicious and tasted like Coq au Vin to me. The method was definitely simpler than Julia Child's recipe, which I do want to try next time. 

6 chicken pieces (I used thighs and breasts with bone and skin on)
1 T olive oil
1 T butter
2 strips of bacon cut into lardons
2 stalks of celery, finely chopped
1 large carrot, finely chopped
1 onion, finely chopped
1 T cognac
4 T flour
about 15 pearl onions
1-2 cups mushrooms, sliced
2 cups chicken stock
1/2 a bottle of red wine (should be Bordeaux but I just had Shiraz)
bouquet garni:
-3 sprigs of thyme
-a sprig of parsley
-3 bay leaves

Season chicken lightly with salt and pepper. In an oven-proof casserole, heat olive oil and butter and brown the chicken pieces on all sides. Remove chicken from pan and bacon lardons to render the fat. If there is too much fat for your taste, drain some of it and add the mirepoix, season and brown. Once the mirepoix has browned, add the chicken back into the pan and pour in the brandy to deglaze. Bring a lit match close to the liquid to flambe. Swirl the pan around until the flame is gone. Pour in the red wine and chicken stock, add the bouquet garni and pearl onions, bring to a boil. Bring down to a simmer, add the sliced mushrooms and keep simmering for 30 minutes. Season lightly with salt and pepper. Transfer the casserole to a 170C oven and continue cooking for one and a half hours.


Remove the bouquet garni and serve hot with scalloped potatoes, mashed potatoes or buttered noodles. 

I truly had a moment making this meal. As I was prepping my mirepoix and putting all the elements of the dish together, I was smiling, thinking of my mom and my aunt. Who knew that those individual moments of discovering food in Ohio and California would lead to me cooking up a dinner that would put a huge smile on our faces down here in Sydney? The back story made the meal that much more enjoyable for me. And it made for good dinner conversation with Mr. P too.

Monday, August 23, 2010

Holy Smokes!

Not just the fish but the entire flat was smoked! Yes, I didn't heed warnings to do this outside because I was too curious and excited to get to it. I had learned about smoking fish using simple tools like a wok and some foil from a Masterclass episode of Masterchef a few months ago. When I read this blog post last week I remembered that I wanted to try it out.  

Taking the tips from both sources, I got started. I had some green tea leaves, trout fillets and a wok with a rack. This really felt like a kitchen experiment. Smelling the wonderful aroma and thinking about the rich smokey flavored fish we were going to have for dinner, I was smiling all throughout the process. Mr. P is not a huge fan of fish. He likes it but is a little picky about it. Smoked is not on the top of his list. Yes, I was taking a risk here but the discovery of a new technique was definitely worth it.

Tea Smoked Trout
400g of trout fillets
Splash of white wine and lemon juice
salt and pepper

1/2 cup jasmine rice
1/2 cup tea leaves (I used the peach flavoured green tea I have now)
1/2 cup sugar 

Season the fish with the salt, pepper, lemon juice and white wine while preparing the rest of the ingredients. I read that some cure the fish prior to smoking while others just go straight to smoking. So, I decided to go half way and marinate my fish briefly.
The smoking mixture in its foil receptacle.
Make a receptacle out of foil for the smoking mixture. Put the rice, tea and sugar and in it and place the whole thing at the bottom of the wok. Spray or brush the rack with some oil. Turn the heat to med-high and cover the wok. Once the mixture starts to smoke, lay the fish fillets on the rack and cover the wok tightly. Use some foil to seal off the sides if like mine, your cover is not tight enough. Allow your fish to smoke for 6-8 minutes until it flakes easily with a fork. Turn off the heat and set fish aside. (If you plan on doing this indoors, I suggested taking your covered wok outside and removing the cover there. That way most of the smoke will just waft through open air, and not into every room and corner of the house.)
Smokin'
I decided to make an herbed yogurt sauce for the fish.

Yogurt Sauce
1/2 cup of Natural Yogurt
1 clove of Garlic
a handful of chopped herbs: I had basil, chives, parsley and a bit of rosemary
1T lemon juice
2T extra virgin olive oil

Put the yogurt in a sieve lined with a sheet of paper towel or a cheese cloth. Allow it to drain for about 6 hours. Meanwhile, grind the garlic, chopped herbs, a dash of the olive oil, salt and pepper in a mortar and pestle. 
Once the mixture is finely ground whisk in the rest of the olive oil and the lemon juice. When the yogurt is ready, put it in a bowl and whisk in the garlic and herb mixture to blend. You can do this in a food processor too. Add lemon juice and/or olive oil to thin it out if necessary. Season to taste.

To cut through the rich smokey taste, I made a citrus salad and to make it a full meal, accompanied it with lentil puttanesca and a forgotten sweet potato that I just roasted.

Green Salad with Fennel and Citrus
a bunch of mixed greens good for two
half a bulb of fennel
segments of 1 mandarin orange

I'm not a huge fan of raw fennel so I just roasted it for 8 minutes in the oven with a little bit of salt, pepper and olive oil. Once done, let it cool and toss with the greens and orange segments. I like to do the segments over the salad so any juice that runs just works to further dress the leaves. 

Lentil Puttanesca
-half a red onion, finely chopped
-1 garlic clove, finely chopped
-1 anchovy fillet, chopped
-1 tablespoon of capers
-2 tablespoons of black olives, roughly chopped
-1 tomato, roughly chopped
-1 can of french lentils
-2T red wine vinegar
-1-2T extra virgin olive oil
-1T parsley, finely chopped
-1T basil, finely chopped
-dash of chili flakes
-salt and pepper

Chop the onion finely and saute in the olive oil until tender. Add the chopped garlic to the pan. Season with a little salt and pepper. Once the garlic begins to cook, add the tomatoes and allow it to soften slightly with the heat. Toss in the anchovies, capers, olives and lentils. Stir lightly to combine and heat through. Pour in the red wine vinegar and stir through. Remove from heat and finish with the chopped herbs, chili flakes and a dash of extra virgin olive oil. 


Due to the saltiness of the anchovy, capers and olives, you may just need to add pepper and omit the salt in the final seasoning. Check to see if the taste is to your liking.


For the final assembly, toss the fennel, greens and cooled lentils together. Arrange the orange segments nicely over the salad and place the roasted sweet potato discs neatly around the dish. I then flaked the smoked trout into slightly large chunks and put this on top of the salad, in between orange segments. Spoon the yogurt sauce over each chunk of fish. 


The combination of flavours was really refreshing. Both Mr. P and I could not get enough. The light citrus and vinegar from the lentil salad cut through the richness of the fish perfectly. It was a light and delicious one-dish dinner and would make a great addition to a barbecue or a picnic.

Friday, August 20, 2010

Baking Exploits: Lemon Yogurt Olive Oil Cake and Key Lime Pie

My First Cake Ever!

My family and my close friends know that I am not a big fan of baking. I love the kitchen and I love cooking, but baking is a whole different story for me. I just really find the need to measure each and every ingredient so tedious. Not to mention, the need to follow each and every step in sequential order. In many ways, I just like to freeform. In my cooking, I usually modify a recipe that interests me so I achieve the taste I know I want out of a dish. Once in a while I'll follow the recipe exactly. That's when it is a dish, cuisine or a technique I'm exploring for the first time, or if it comes from someone I know is an excellent cook or chef. 

In my book bakers and pastry chefs are highly regarded. I think that their discipline and technique is amazing. I just love watching or reading about those who are so comfortable in their art that they can even freeform their baked goods. Amazing!

The thing that freaks me out the most about baking is the the thought that for an amateur like me, there seems to be no way of knowing whether the goods will be perfect or, god forbid, a complete disaster! Not until it's too late. Not until the only way to fix it is to chuck it and start over. My heart hurts just thinking of all the ingredients, time and effort that could possibly go to waste. 
WET ingredients, measuring going well so far...
All together now! Hoping for the best...

Mr. P and I were invited by my godfather to a picnic last weekend. Days have been getting warmer and I thought, hooray, what a fun way to spend what would have been a lazy Sunday. I of course ask what we could bring and while picnic-friendly savoury ideas are running through my mind, I get a text back saying: a cake. A CAKE?! Wow, left field suggestion. God help me, I don't bake. "But you don't bake," Mr. P confirms to me when I tell him the news. We were both laughing. My fighting spirit drove me to take this challenge on, a challenge from my godfather nonetheless. I resolved that I was not going to succumb to a store-bought mix or a bakery-bought cake. I was going to bake from scratch.

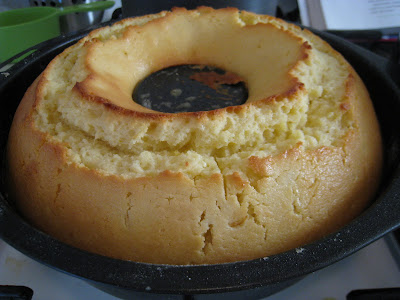
I announced on my Facebook page that I was going to bake. My wonderful cousins suggested in jest a donut cake, because that's what our Nana would serve for dessert every Sunday. No, it is not a giant sized piece of fried dough, but rather a regular cake baked in a pan with a hole in the middle. We liked to call it donut cake as kids. I went out to the store and found exactly that pan. I thought that since it was Nana's death anniversary that week, I would make a donut cake in her memory. As I was scouring through my cookbooks and favourite food blogs, Trina and Rachel (some of my favourite food exploring friends) both came up with wonderful suggestions. Two desserts that were fitting for a beginner baker like me.

Trina's suggestion was Key Lime Pie. I absolutely adore anything that involves tart and sour flavours. Reading her recipe here, I thought it would be easy enough. This was definitely going to be my back up in case my main cake did not rise, OR taste good.

"But how will you know that it tastes good if you can't cut the cake until it's time to serve it?" asked the very concerned husband. I think that knowing the potential for an embarrassing situation at the picnic was secretly killing him. "I don't know, I'll just follow the recipe to a T and it should be good, Rachel told me how to do it and she is one of those whose recipes I like to follow exactly." Obviously, I didn't realize that it would rise in such a way that I'd have to cut the top and yes, have a piece to taste before THE day.
Hooray! He has risen!

Rachel shared a fabulous Lemon Olive Oil cake recipe. I read it and it sounded very similar to Ina Garten's Lemon Yogurt Cake, only Ina's cake base had less steps. What I loved about Rachel's cake was the inclusion of Olive Oil and the topping of blueberry syrup and mascarpone cheese. So I asked Rach if it would be possible to do a hybrid and she gave me the go signal. Yes! I am going to get on with this cake. I was actually excited! 

Right as I was about to start, I speak to my awesome cook and non-baking sister Mrs. G who asks: "do you have extra ingredients in case you have to repeat?" Gosh, the faith in my baking prowess is apparent with both the spousal and sisterly units!

Here's my hybrid of both recipes:
Lemon Yogurt Olive Oil Cake
1 1/2 cups all purpose flour
2 teaspoons baking powder
1/2 teaspoon salt
1 cup Greek style yogurt
1 1/3 cup sugar divided
3 large eggs
2 teaspoons lemon zest
1/2 teaspoon vanilla extract
1/2 cup extra virgin olive oil
1/3 cup freshly squeezed lemon juice

Preheat the oven to 170C, grease the pan, dust with flour and line with parchment paper. 

Sift the flour, baking powder and salt into a bowl. In a separate bowl, whisk the yogurt, 1 cup of sugar, eggs, lemon zest and vanilla. Add the dry ingredients slowly into the wet. I did it in three batches. Fold the olive oil into the batter using a spatula. Once all ingredients are incorporated, pour the batter into the pan. For my pan, I just needed 40 minutes in the oven. 

(At this point, I have to confess that I tasted the batter and it was not lemony enough for me. I knew about the next step but the freeform-er (and hard-headed girl) in me just HAD to add a little lemon juice. I just squeezed in the juice of about half a lemon.)

While the cake is baking, cook the 1/3 cup lemon juice and remaining sugar in a small pan until the sugar dissolves. Set aside. When the cake comes out of the oven, allow it to cool in the  pan for 10 minutes. Remove from pan and place on a baking rack over a sheet pan. Cut off the top, hurray for scraps that you can taste test! Pour the lemon syrup all over the cake and allow it to soak through and cool completely.

For the topping:
1 pint blueberries
1 lemon, zested
1/3 cup sugar
1 cinnamon stick
1/4 cup water
1 pint mascarpone

Combine all the ingredients except the mascarpone in a saucepan. Bring mixture to a simmer and cook for 20-30 minutes until the berries burst and the liquid comes to a jam-like consistency. Remove cinnamon stick and allow to cool completely.

Separately, whip room temperature mascarpone with the zest of 1 lemon and 1/2 teaspoon vanilla extract. 

I made my cake two days ahead, covered it tightly in plastic wrap and kept it at room temperature. About 15 minutes before serving, I spread the mascarpone mixture on top of the cake and poured the blueberry mixture over it. 

Finally, here they are. My Key Lime Tartlets and Lemon Yogurt Olive Oil Cake. They both tasted great to me and I think the reactions proved the same. 
Not so great looking but yummy nonetheless.
The real star of the show.


Thursday, August 19, 2010

Bowl Food: Thai

Dinner time is sacred, to me at least. I attribute this to the way we grew up and spent so much time at the dinner table. In our family, like most I'm sure, we sat together for meals. Dinner time however, being the only meal of the day when everyone was surely home from work or school could not be missed. All seven of us would sit and eat our dinner course by course. We'd start with soup and nobody could go on to the next course unless each one was done with their soup. If you just had one serving and I wanted to go for seconds or thirds, you and everyone would have to wait for me to finish before starting on the main dishes that followed. Once in a while, someone would get impatient about another taking long but more often, these "waiting periods" were the most enjoyable moments at the dinner table. These were the moments when lively family conversation would happen. Sometimes it would be two people conversing, other times three or four or more. It was so much fun growing up at the dinner table like this. I'm sure it is one of the things that brought us so close to each other that to this day no matter how scattered we are all over the globe, we still want to and manage to keep the lively conversations going - dinner time or not.
I'm thankful that our parents (unbeknownst to us back then) designed dinner time as family bonding time. It is something I want to continue with my own unit. So for now, our unit of two (not seven) looks forward to meal time not just for the food but for the bonding as well. More often than not, we'll sit at the table for dinner, say grace and chat endlessly over our meal. BUT, we do make exceptions. Mr. P. works really long hours so on some days, he'd rather stay on the couch from the time he gets home until the time he showers and goes to sleep. On nights like these, I make sure to prepare something that can be eaten easily with one hand holding the bowl of food and the other hand holding just ONE utensil. We'll cozy up on the couch, put on one of the shows we follow and happily eat our bowl food. It may not be the ideal scenario for building closeness if and when we have our own kids but for just the two of us, it definitely works. It feels like quality time and dinner time all rolled into one.

Bowl food night last week was Thai inspired: Satay Style Chicken over rice with sauteed vegetables on the side.

Satay Style Chicken (for 2)
This recipe was adapted from here. Marinate 3-4 chicken thigh fillets overnight in equal parts (as per original recipe, it's 2 tablespoons each) of:
-lime juice
-fish sauce
-soy sauce
-curry powder
-sugar
In addition, I put in about 1 teaspoon of Sriracha sauce into the mix and seasoned the chicken with salt and pepper prior to marinating. I just think that despite the marinade, this step ensures a tasty piece of chicken. I for the life of me, cannot stand under-seasoned chicken. Cut the thighs into strips before marinating to further enhance flavour absorption of each piece.


The ideal way of cooking this is to grill the chicken if you have a barbecue grill. Since we don't I just placed the chicken pieces on a baking rack over a cookie sheet and grilled them in the oven. I put the outer leaves and unusable parts of two lemongrass stalks on the baking sheet, beneath the chicken, for added fragrance and flavour while grilling. Preheat the oven to 180C. Since the chicken had been cut into strips, it only took about 10-15 minutes in the oven. It came out really juicy and tender. For the real satay effect, you can skewer your chicken, but for this meal, it had to be bowl food.
Of course, chicken satay is not chicken satay without the peanut sauce. Here's how I modified the original recipe:


Peanut Sauce
1T ground ginger
2 cloves of garlic
1/3 red chili, minced
3T ground lemongrass
3T chopped cilantro
1T ground turmeric
1/2 tomato, diced
4T peanuts
1/8 c rice bran oil and a dash of sesame oil
1/8 c soy sauce
1/8 c mirin
2T sugar
1/8 c coconut milk
1/8 c peanut butter
Heat the oil in a saute pan and add in the ginger, garlic, chili, lemongrass, cilantro and turmeric. Heat over med-low heat until very fragrant. Add the tomato, peanuts and a dash of sesame oil. Continue to heat for about 3 more minutes, until tomato softens. Stir in the soy sauce, mirin, sugar, coconut milk and peanut butter. Allow the mixture to simmer for 5-7 minutes until it thickens. Stir pretty constantly so that nothing burns. Remove from heat and use a stick blender to crush the peanuts and process the mixture into a thick and slightly chunky consistency. Serve hot with the chicken over rice.


He was happy so I too was happy. It was exactly what he needed after a long day at work. We'll definitely do this again.


Wednesday, August 4, 2010

Decadent Breakfast at bills

My friend Cat was in town with her cousin Trish and for her final morning in Sydney, we decided to have breakfast at bills in Darlinghurst. This is the original breakfast joint of Bill Granger and one that I have been wanting to eat at.
There's Cat outside the door of bills.
My breakfasts whether out or at home can NOT start without a cup of coffee. I'm glad I had that taken care of before heading out this morning because there was no way I could pass up on bills Hot Chocolate made with Callebaut. I was expecting a cup of brown chocolate-y liquid to arrive at the table but was pleasantly surprised by something even better. A glass of warm milk with the actual nibs of Callebaut chocolate in it, melting slowly. Ah, it was decadent and it was divine. Enough said.
Lusciousness in a glass!
Apparently, bills is famous for their organic scrambled eggs. The eggs is the food item that supposedly brought him his fortune. I decided to see for myself if it is all it's cracked up to be, and all I can say is: wow, who knew that something as simple as scrambled eggs could be so good! These are your favourite hotel style scrambled eggs taken to the next level. With a side of house cured trout, fresh butter and organic sourdough bread, I was in heaven. It reminded me of why breakfast is my favorite meal of the day.
The other thing I love about bills is the ambience. Glass windows that allow lots of natural light into the place, minimalist wooden furniture, and warm lighting makes the place feel smart and homey at the same time. The best part: his cookbooks are there for you to read through while you wait for breakfast to be made. Lo and behold, the recipe for his scrambled eggs calls for 2 eggs and a THIRD OF A CUP of cream. Ay! No wonder it is so rich and fluffy at the same time. Can I say decadence part two? And that I'll need a major workout tomorrow and for the next three days?
The communal table at the center, making the place really feel homey.
Trish leafing through one of the cookbooks.
Here is Cat's breakfast which was equally delicious. Ricotta hotcakes with fresh bananas and honeycomb butter. Though she was looking for something salty after a while, the two bites I had were really yummy. The pancakes were as fluffy as they look and the honeycomb butter is a new pancake accompaniment that I would crave and come back for.

So there you have it, our bills experience was a fantastic start to our morning. To burn off some of those calories we splurged on, we decided to stroll through Darlinghurst and Paddington as the sun finally decided to beat the wind and rain. And I leave you with a decadent reminder along our walk.
Max Brenner side wall
A day of decadence indeed! You would have loved it.